
Home for the Holidays

As my old blog is slowly disintegrating with broken links and missing photos, I thought I would re-post my all-time most popular tutorial, which, to my shock, has had over a million views at the old site!!

Don't you love a cute house ornament? These scrappy house ornaments are so much fun to make, and they do include hangers, I just tucked them under for the photo above.
Fabric House Ornament Tutorial
Materials:
Pattern (click here to get pattern)
Quilting cotton scraps for house back, roof, window, and door
Fabric with numbers or fabric selvage for house number
Linen, linen/cotton blend, or cotton quilter’s linen for house front
Wool or wool-blend felt scraps for bird
10” length of ribbon, 3/8” to 1/2" wide (satin, grosgrain, velveteen, picot edge, twill tape, etc.)
Rick rack (1/2" wide), miniature pom pom, or other trim
Wonder Under fusible web (1/8 yard)
Sheer weight or lightweight fusible interfacing (1/8 yard)
All purpose thread
Embroidery thread
Button
Polyfill or other stuffing material
Tools:
Scissors, rotary cutter/quilting ruler/cutting mat (optional), sewing machine, iron/ironing board, pins, seam ripper, hand sewing needle, disappearing fabric ink, chopstick or turning tool
*Seam allowances are 1/4" unless otherwise noted, finished house is 4-1/2" tall, not including chimney.
*Always backstitch/backtack at the beginning and end of each seam.
Instructions:
HOUSE
1. Cut a piece of fusible interfacing slightly larger than the house pattern piece. Fuse the interfacing to the wrong side of the linen with a hot iron according to package instructions. Press with iron on the linen side until the interfacing is completely fused. Use a ruler and rotary cutter to cut around the house pattern.
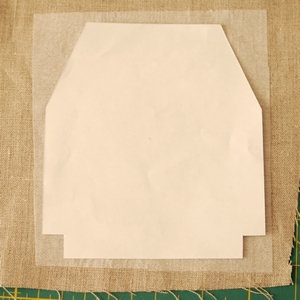

2. Draw the cutouts at the bottom of the house with disappearing fabric ink (the cutouts are 1/2" x 1/2"). Cut on the lines with scissors. Cut another house from quilting cotton (there is no need for interfacing for the cotton house).

ROOF
1. Place a length of rick rack or pom pom trim on the linen house fabric, indicated on the pattern with a dotted stitch line. Center the trim over the line. I find it helpful to draw a line with a fabric pen 1-3/4" from the top of the house (the solid line on the roof of the house pattern). The top of your medium sized rick rack should meet this line, as well as the roof fabric when you place it over the rick rack (see Step 2). Mini pom pom is a little narrower than rick rack, and so sits a little lower than 1-3/4".

2. Place the roof fabric on top of the trim, right sides together, with the edge of the fabric 1/4” above the stitch line. Sew a 1/4” seam along the stitch line.

3. Fold the roof fabric up. If you use rick rack, go ahead and iron the fabric. If you are using pom pom trim or other synthetic trim DO NOT PRESS WITH IRON!!! Pom pom trim melts very easily. Finger press the fabric only.

4. Turn the house over, and trim the roof fabric to match the outline of the house.

5. Turn the house back over and machine baste the roof fabric in place, very close to the edge of the house.

DOOR, WINDOW, & HOUSE NUMBER
1. Cut a piece of Wonder Under slightly larger than the appliqué piece.

2. Adhere the Wonder Under to the wrong side of the appliqué fabric with an iron (bumpy side of Wonder Under to wrong side of fabric). Let cool. Lift up an edge of the paper backing to loosen it from fabric.

3. Cut out the piece of fabric that is fused to the Wonder Under.
4. Remove the paper backing from the fabric. Place the pattern piece on the sticky side of the fabric and cut around it.
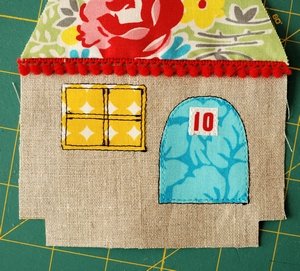
5. Remove the pattern and iron the appliqué in place on the front of the house. Do this for the window, door, and house number, using the pattern as a guide for placement. DO NOT decorate your house below the line marked on the pattern, and remember to keep the iron away from any heat-sensitive trims!
6. Using a straight stitch on your machine, sew around the outside edge of the appliqué, just off the fabric edge. Sew a second line just on the inside of the fabric edge. For the door, I used thread that matched the door on the inside of the fabric, black on the outside. For the window, I used black thread only. I sewed pretty fast, not aiming for a super straight line, I like the hand drawn look of wobbly lines. For the house number, I only sewed one seam, on the inside of the fabric edge.
BIRD
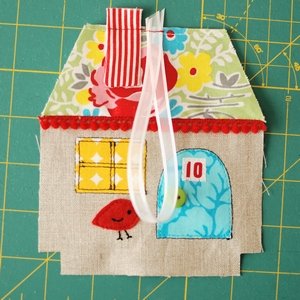
1. Cut a bird from felt and place it on the house. Sew in place by machine with matching thread, just on the inside edge of the felt.

2. Divide the embroidery floss and use three strands for the bird. Hand embroider beak, feet, and wing with backstitches.


3. Make a French knot eye.


BUTTON DOORKNOB
1. Add the button last so you don't have to worry about bumping into it while sewing the birdie or other appliqués.
CHIMNEY & HANGER
1. Fold chimney fabric in half. Sew across the top and down the side with the raw edges.

2. Trim corner and seam allowances.

3. Turn right side out and press.
4. Place chimney upside down where indicated on the pattern, right sides together. Sew in place very close to the edge of the fabric. Fold ribbon hanger in half, place on the top and center of the roof and sew in place very close to the edge.
5. Alternate method: you may press under the top and side edges of the chimney fabric 1/4", right sides facing out, and hand sew the chimney closed with a ladder/blind stitch before attaching to house.
FINISH
1. Place the front and back of your house right sides together and pin. Make sure your ribbon will not get sewn into the seams. Sew around the bottom, sides and top of the house, leaving a 1-1/2” turning hole on one side. DO NOT sew the notched cutouts yet.

2. Reach inside the house to pull open the cutout on one side. Flatten it so the seams match up, and the seam allowances go in opposite directions. Sew across this short straight edge with a 1/4” seam allowance. Repeat for other side. Make sure the seam allowance on the bottom of the house is folded the same direction on both sides.


3. Turn the house right side out, stuff, and close the turning hole with a ladder stitch.

4. You're finished! Hang your ornament on a tree, doorknob, wall or stocking hook.

Happy homemaking!
Kim
P.S. The number fabric is Annie's Farm Stand Seed Catalog from Lakehouse. It has lots of different numbers in several fonts and sizes, perfect if you're going to make a bunch of these.